Master Adobe Lightroom by starting with the fundamentals: import your first batch of photos and spend fifteen minutes learning the Library module’s organizational tools, including star ratings, color labels, and collections. This foundation prevents the overwhelming feeling that derails many beginners.
Progress systematically through the Develop module by focusing on one panel each week. Begin with the Basic panel’s exposure, contrast, highlights, and shadows sliders, which handle 80% of most editing needs. Resist jumping to advanced techniques before understanding how these core adjustments interact with your images.
Practice the histogram reading skill that separates confident editors from hesitant ones. Every adjustment you make creates immediate visual feedback in this tool, showing exactly where your image data sits and preventing blown highlights or crushed shadows that ruin otherwise strong photographs.
Build your editing speed through keyboard shortcuts rather than mouse clicking. Learn C for Compare view, Y for Before/After, and the bracket keys for flagging, which transforms a two-hour culling session into thirty focused minutes.
Apply your learning to real projects immediately. Edit yesterday’s photos using today’s tutorial lesson, creating muscle memory that watching alone never achieves. Photography communities consistently report that students who edit alongside tutorials retain techniques five times longer than passive viewers.
Track your progress by revisiting and re-editing photos from three months ago. You’ll discover how much your eye has developed and identify specific weaknesses requiring targeted tutorial attention, whether that’s portrait retouching, landscape color grading, or architectural perspective correction. This reflective practice accelerates growth beyond linear tutorial consumption.
Why Adobe Lightroom Is Your Best Friend for Photo Editing
If you’ve explored different photo editing programs, you might wonder what makes Adobe Lightroom stand out in such a crowded field. The answer lies in its thoughtful design philosophy and the unique way it transforms your editing workflow.
At its core, Lightroom operates differently from traditional image editors. Unlike software that permanently alters your photos, nondestructive editing preserves original data while tracking every adjustment you make. Think of it as creating a recipe rather than baking a cake. Your original photo remains untouched in storage while Lightroom remembers all your editing instructions. This means you can experiment freely, returning to any previous version or starting fresh without ever damaging your precious memories.
Many photographers mistakenly believe Lightroom is either too basic for serious work or too complex for beginners. The truth sits comfortably between these extremes. Lightroom offers professional-grade tools packaged in an interface that grows with your skills. When you’re starting out, the sliders and basic adjustments make sense immediately. As you advance, you’ll discover powerful features like masking, color grading, and batch processing that professional photographers rely on daily.
The organizational capabilities deserve special mention because editing isn’t just about making photos beautiful; it’s about finding them later. Lightroom’s cataloging system lets you tag, rate, and search through thousands of images effortlessly. Professional photographers managing wedding shoots with hundreds of photos or travel photographers organizing years of adventures appreciate this integrated approach. Everything lives in one ecosystem, from import to final export.
Perhaps Lightroom’s greatest strength is its learning curve that actually feels like a gentle slope rather than a cliff. You can achieve satisfying results on day one with basic exposure and color adjustments, then gradually explore advanced techniques as your confidence builds. The community around Lightroom has created extensive tutorials for every skill level, making it easier than ever to find guidance tailored to your current needs.
Whether you’re enhancing smartphone snapshots or processing professional RAW files, Lightroom adapts to your journey. It’s this versatility, combined with its forgiving nondestructive approach, that makes it an invaluable companion for photographers at every stage of their creative development.
Getting Started: Essential Lightroom Tutorials for Beginners
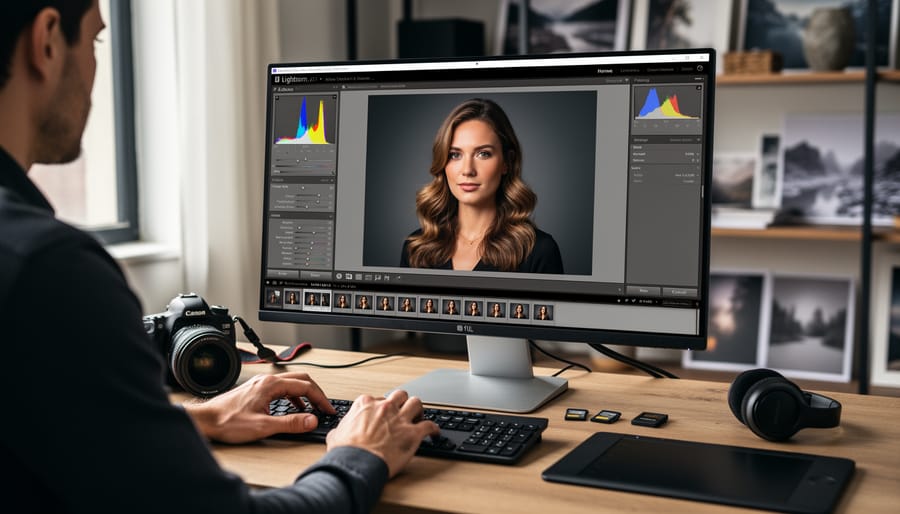
Navigating the Lightroom Interface
When you first open Lightroom, the interface might feel overwhelming, but it’s designed with a logical workflow in mind. Think of it as moving through three main rooms in your creative house, each serving a specific purpose in your photo editing journey.
The Library module is your organizational hub and starting point. This is where you import photos, create collections, add star ratings, and apply keywords to keep everything organized. The left panel shows your folder structure and collections, while the right panel displays metadata and quick develop options. Spend time here getting comfortable with organizing your work because a well-organized library saves countless hours down the road.
Next comes the Develop module, where the magic happens. This is your creative workspace for editing individual images. The left panel contains presets and snapshots for quick adjustments, while the right panel houses all your editing tools from basic exposure corrections to advanced color grading. The histogram at the top guides your tonal adjustments, and the filmstrip below lets you quickly navigate between photos. Most of your editing time will happen here, so familiarize yourself with where each slider lives.
Finally, the Export module prepares your finished images for sharing. Here you’ll set file formats, resize dimensions, add watermarks, and choose save locations. While it seems straightforward, understanding export settings ensures your photos look their best whether they’re heading to Instagram or a professional print lab.
Mastering Basic Adjustments
The Basic panel in Lightroom is where every great edit begins, and understanding these six fundamental sliders will transform your photography. Think of these adjustments as the building blocks that set the stage for everything else you’ll do to your images.
Start with Exposure, which controls the overall brightness of your image. Moving this slider right brightens your photo, while left darkens it. For most images, you’ll want to adjust exposure first to get your midtones looking natural. Contrast comes next, controlling the difference between your light and dark areas. Increasing contrast adds punch and drama, while decreasing it creates a softer, more muted look.
Here’s where things get powerful: the Highlights and Shadows sliders let you recover detail that might otherwise be lost. Highlights specifically target the brightest areas of your image. If you’ve got a blown-out sky, dragging the Highlights slider left can often bring back those clouds and texture. Shadows work the opposite way, lifting the darker areas to reveal hidden details without affecting your entire image like Exposure would.
The Whites and Blacks sliders are your fine-tuning tools. Whites control the brightest white point in your image, while Blacks set the darkest black point. Together, they help you establish the tonal range and add depth to your photos.
A common mistake beginners make is pushing these sliders to their extremes. If you’re constantly maxing out at +100 or -100, you’re likely creating an unnatural appearance. Instead, aim for subtle adjustments that enhance rather than overwhelm your image. Watch your histogram as you work—it’s your best friend for ensuring you’re not clipping highlights or crushing shadows unnecessarily. Remember, great editing often means knowing when to stop.
Understanding the Histogram
The histogram is one of Lightroom’s most powerful yet underutilized tools, and learning to read it will transform your editing workflow. Think of it as an objective map of your image’s tonal values, showing you exactly where your pixels fall from pure black on the left to pure white on the right.
Your computer screen can deceive you. Ambient lighting, screen calibration, and even the time of day can affect how an image appears to your eyes. The histogram, however, never lies. It displays the distribution of tones in your photo, with the height of each area representing how many pixels exist at that brightness level.
When you start editing, glance at the histogram first. Are there gaps showing missing tonal information? Is everything bunched up in one area? Clipped highlights appear as a spike touching the right edge, while crushed shadows show up as a spike on the left. These clipping warnings tell you when you’ve lost detail that can’t be recovered.
Here’s a practical approach: hover your cursor over different areas of the histogram to see which parts of your image they correspond to. As you adjust sliders for exposure, highlights, or shadows, watch how the histogram shifts. This real-time feedback helps you make informed decisions based on data rather than what your eyes think they’re seeing on screen. This skill becomes invaluable when editing across different devices or preparing images for print.
Intermediate Techniques to Elevate Your Edits
Color Theory and HSL Panel Mastery
The HSL (Hue, Saturation, Luminance) panel is where color magic happens in Lightroom, giving you precise control over every shade in your image. Think of it as your personal color mixing studio, where you can transform a muddy green forest into a vibrant teal wonderland or shift golden hour oranges to perfectly peachy tones.
Start by understanding the three sliders for each color channel. Hue shifts the actual color (making blues more cyan or purple), Saturation controls intensity (how vivid or muted), and Luminance adjusts brightness (making colors lighter or darker). The beauty of HSL is that you can target specific colors without affecting others. For example, you can desaturate only the greens in a portrait to make foliage less distracting, while keeping skin tones vibrant.
To create cohesive color palettes, work methodically through complementary colors. A popular approach is the orange and teal look: boost oranges in skin tones while shifting blues toward teal, then adjust saturation to taste. For moody, cinematic aesthetics, try lifting the luminance of blacks and reducing saturation in blues and greens.
Here’s a practical workflow: First, identify which colors dominate your image by hovering over them with the targeted adjustment tool (the small circle icon in the HSL panel). Click and drag directly on your image to adjust that specific color range. This intuitive method helps beginners understand which slider affects what.
Practice with different genres to build your color instincts. Landscape photographers often enhance blue skies and adjust green foliage separately, while portrait photographers focus on perfecting skin tone oranges and yellows. Remember, subtlety wins—small adjustments often create the most professional results. The community thrives on sharing color recipes, so don’t hesitate to experiment and find your signature style.

Working with Brushes and Gradients
Local adjustment tools are where Lightroom truly shines, allowing you to selectively edit specific areas of your photos without affecting the entire image. The Adjustment Brush and Gradient tools give you surgical precision in transforming your photographs, and once you master them, you’ll wonder how you ever edited without them.
The Adjustment Brush works like painting with light and color. Select the brush tool from the toolbar beneath your histogram, then choose which settings you want to adjust—exposure, contrast, clarity, saturation, and more. The key to natural-looking results is adjusting the brush size, feathering, and flow settings. A larger feather creates softer transitions, while lower flow gives you gradual buildup control.
Let’s explore some practical applications. To brighten someone’s face in a portrait, select the brush, increase exposure slightly (around +0.50 to start), and paint over the face. The “Show Selected Mask Overlay” option helps you see exactly where you’re painting—this feature is invaluable for beginners learning brush control. You can always refine your work using the erase mode.
For darkening overexposed skies, the Graduated Filter is your best friend. Click and drag from the top of your image downward, creating a smooth transition. Reduce exposure and perhaps boost contrast to restore drama to washed-out skies. You can even add color temperature adjustments to enhance sunset warmth.
The Radial Filter creates circular selections, perfect for drawing attention to specific subjects by darkening or brightening surrounding areas. Invert the mask to apply adjustments inside or outside the circle.
Remember, subtlety is key. Make small adjustments and build gradually. You can always return to any adjustment point and modify settings later, making these tools both powerful and forgiving as you develop your editing style.
Creating and Using Presets Effectively
Presets are powerful time-savers that store your favorite editing settings for instant application across multiple photos. Think of them as recipes for your editing style that you can apply with a single click.
To create a custom preset, start by editing a photo until you achieve a look you love. Then, navigate to the Develop module and click the plus icon next to Presets in the left panel. A dialog box will appear where you can name your preset and select which adjustments to include. Be selective here – you might want to save only your color grading settings while excluding exposure adjustments, since lighting varies between photos.
Presets work best when applied to images shot in similar conditions. Wedding photographers, for example, often create presets for ceremony lighting, outdoor portraits, and reception shots. This ensures visual consistency throughout a photo series while maintaining your unique editing signature.
However, presets aren’t one-click solutions. After applying a preset, always fine-tune individual images by adjusting exposure, white balance, and highlights to match each photo’s specific needs. This hybrid approach combines efficiency with personalized attention, giving you consistent results without sacrificing quality. Start building your preset library gradually, and you’ll develop a toolkit that speeds up your workflow while preserving your creative vision.
Advanced Lightroom Tutorials for Professional Results
Advanced Masking and Selection Techniques
One of Lightroom’s most powerful features is its advanced masking capabilities, which have evolved dramatically in recent years. Adobe’s AI-powered Select Subject and Select Sky tools are game-changers that save you countless hours of tedious manual selection work. With a single click, these intelligent tools can identify and isolate your main subject or sky, even in complex scenes with intricate details like hair or tree branches. This technology makes professional-level editing accessible to everyone in our photography community, regardless of your technical background.
Beyond basic selections, range masking takes your editing precision to the next level. This technique allows you to refine masks based on specific color ranges or luminance values. For example, you can target only the bright highlights in a sunset sky or isolate specific color tones in autumn foliage. The beauty of range masking is how it gives you surgical precision without requiring advanced Photoshop skills.
The real magic happens when you combine multiple masks for complex edits. Lightroom allows you to layer masks using add, subtract, and intersect modes, similar to how a painter builds up layers on a canvas. You might start with an AI subject selection, then subtract certain areas using a brush, and finally refine with luminance range masking. This layered approach gives you complete creative control while maintaining a non-destructive workflow. As you experiment with these techniques, you’ll discover endless possibilities for bringing your creative vision to life.
Camera Calibration and Profile Customization
The Calibration panel in Lightroom is your secret weapon for fine-tuning colors at their foundation, giving you precise control that goes beyond standard adjustments. Located at the bottom of the Develop module, this often-overlooked tool lets you shift the actual hue and saturation of your camera’s primary color channels, creating unique looks or correcting persistent color casts that plague specific camera models.
Start by exploring Camera Profiles at the top of the Calibration panel. Adobe provides several preset profiles like Adobe Color, Adobe Portrait, and Adobe Landscape, each rendering colors differently from your RAW file. Think of profiles as different interpretations of the same scene. Try switching between them to see dramatic shifts in color rendition and contrast. Adobe Color typically offers the most balanced starting point, while Adobe Portrait softens skin tones beautifully.
For those persistent color issues your camera consistently produces, the Primary sliders below are game-changers. If your camera renders blue skies with a purple tint, shift the Blue Primary Hue slider toward cyan. Notice skin tones always look too orange? Adjust the Red Primary Hue slightly toward yellow. These micro-adjustments accumulate into significant improvements.
As you experiment, remember that calibration changes affect your entire image simultaneously, unlike HSL adjustments that target specific color ranges. This makes calibration perfect for establishing your signature editing style. Many professional photographers create custom presets starting with calibration adjustments, building their recognizable aesthetic from the ground up. Take time exploring these controls, and you’ll discover endless creative possibilities.
Workflow Optimization and Batch Processing
When you’re working with dozens or hundreds of photos from a single shoot, editing each image individually can feel overwhelming. That’s where Lightroom’s workflow optimization tools become your best friends. The Sync Settings feature is a game-changer—simply edit one photo to your liking, select similar images, and click Sync to apply those adjustments across your entire selection. This works beautifully for photos shot in consistent lighting conditions.
For even faster work, use the Copy and Paste functions (Ctrl+C and Ctrl+V on Windows, Command+C and Command+V on Mac) to transfer specific adjustments between images. You’ll have control over exactly which settings transfer, giving you flexibility while maintaining efficiency.
Don’t overlook Auto Settings as a starting point, especially for white balance and tone adjustments. While they won’t always be perfect, Auto can provide a solid foundation that you can refine manually. Think of it as a helpful assistant rather than a complete solution.
Create and save presets for different shooting scenarios—golden hour portraits, indoor events, or landscape shots—to jumpstart your editing process. These techniques free up your creative energy for the images that truly need your personal touch.
Genre-Specific Lightroom Editing Tutorials
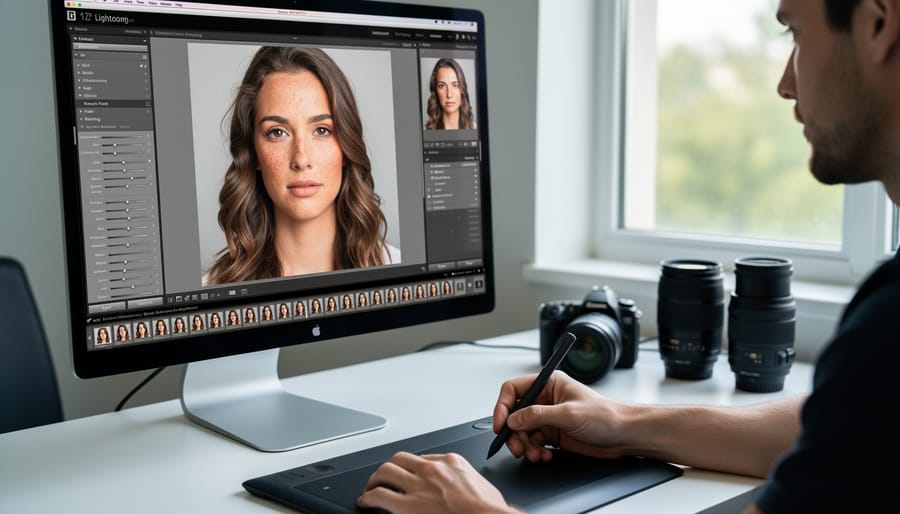
Portrait Retouching Fundamentals
Portrait retouching in Lightroom opens up incredible possibilities for enhancing your subject’s natural beauty while keeping results authentic and professional. Let’s explore the essential techniques that will transform your portrait work.
Start with skin tone adjustments using the HSL panel, where you can fine-tune orange and red hues to achieve flattering, natural-looking complexion. The Temperature and Tint sliders in the Basic panel also play crucial roles in establishing the right mood. Remember, subtle adjustments often yield the most convincing results, so work in small increments and regularly toggle your adjustments on and off to check your progress.
For blemish removal, the Healing Brush and Spot Removal tools are your best friends. Simply click on temporary imperfections like acne or dust spots, and Lightroom intelligently samples nearby skin texture to seamlessly blend the correction. The key is maintaining your subject’s natural skin texture rather than creating an overly smooth, artificial appearance.
Eye enhancement brings portraits to life. Increase clarity and sharpness selectively using adjustment brushes to make eyes pop without overdoing it. Brighten the whites slightly and enhance iris detail by boosting vibrance in targeted areas. You can even add a subtle catchlight to create more engaging, dimensional eyes.
Throughout your retouching process, zoom out frequently to view your image at normal viewing distances. This practice helps you maintain perspective and prevents over-editing, ensuring your portraits look natural and authentic rather than heavily processed. Your goal is enhancement, not transformation.
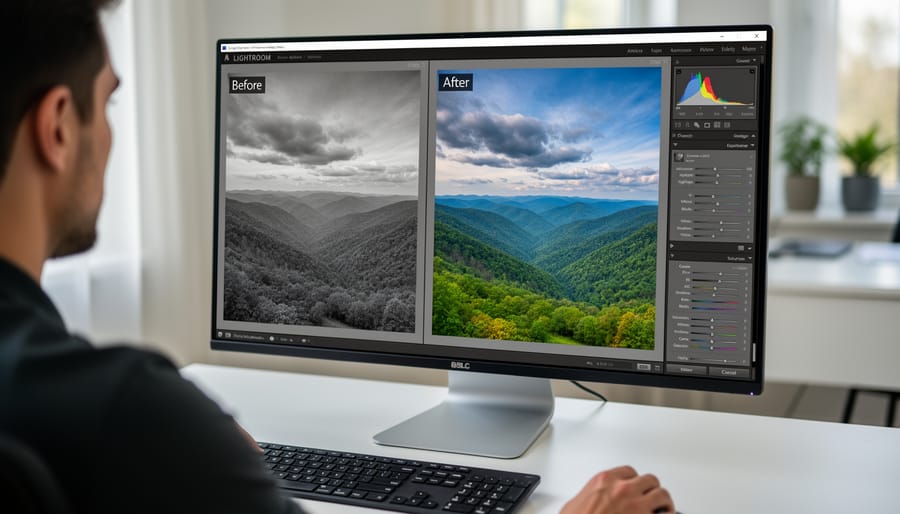
Landscape Photography Enhancement
Landscape photography comes alive in Lightroom when you master a few key enhancement techniques that transform ordinary scenes into breathtaking images. Let’s explore how to elevate your outdoor captures with confidence.
Start with sky enhancement using the Graduated Filter tool, which allows you to darken overexposed skies while maintaining detail in your foreground. Click the Graduated Filter icon, then drag from the top of your image downward to create a smooth transition. Adjust exposure, highlights, and vibrance to bring out dramatic cloud formations and rich color without creating harsh lines.
For compelling foreground interest, use the Radial Filter or Adjustment Brush to selectively brighten elements that draw viewers into your scene. Rocks, flowers, or pathways work beautifully as anchor points. Increase clarity and texture slightly on these elements to enhance their presence without overdoing it.
Creating depth requires working with all three planes of your image. Cool down distant elements using the Temperature slider in local adjustments, while keeping foreground tones warmer. This mimics atmospheric perspective and adds dimensionality. The Dehaze slider works wonders for cutting through haze in mid-ground areas, revealing layers you didn’t know existed.
Remember, subtlety creates the most natural results. Make incremental adjustments and regularly toggle the before-and-after view to ensure your enhancements serve the story your landscape tells.
Street and Documentary Photo Editing
Street and documentary photography presents unique editing challenges because your goal is preserving truth while creating compelling images. Unlike studio work where you control everything, you’re working with whatever light and conditions existed in that genuine moment.
Start by embracing imperfection. Documentary work thrives on authenticity, so resist the urge to over-smooth or heavily manipulate your images. Focus instead on enhancing what’s already there. The Exposure and Contrast sliders become your best friends for recovering details from challenging lighting situations you encountered on the street.
When working with mixed lighting or harsh shadows, use the Highlights and Shadows sliders to balance your exposure without making the image look artificially flat. The key is subtlety. Push these adjustments until details emerge, but pull back before the image loses its natural feel.
The HSL panel helps manage color casts from streetlights or fluorescent sources while maintaining the scene’s atmosphere. Adjust individual color channels rather than applying broad temperature changes that might sanitize the documentary quality.
White balance deserves special attention. While correcting extreme color casts improves readability, sometimes that golden hour warmth or cool blue twilight defines the moment’s essence. Trust your instincts about when technical perfection serves the story versus when atmospheric color enhances it.
Remember, documentary editing honors the scene you witnessed. Your adjustments should help viewers experience what you saw, not create something entirely different.
Free vs. Paid Lightroom Tutorials: What You Need to Know
When you’re starting your Lightroom journey, one of the first decisions you’ll face is whether to invest in paid courses or stick with free resources. The good news? Both options have genuine value, and understanding their strengths will help you make the right choice for your current situation.
Free tutorials offer an incredible starting point for photographers at any level. YouTube channels, Adobe’s official resources, and photography blogs provide thousands of hours of quality instruction without requiring any financial commitment. You can explore different teaching styles, sample various instructors, and learn at your own pace without pressure. For beginners especially, free resources allow you to determine whether you enjoy editing before making any investment. Many successful photographers have built their entire Lightroom foundation exclusively through free content.
However, free tutorials come with trade-offs. You’ll need to piece together your learning path yourself, which can feel overwhelming when you’re faced with thousands of options. Content quality varies significantly, and you might spend considerable time watching videos that don’t match your skill level or learning style. Free tutorials also rarely offer personalized feedback or community support systems that can accelerate your growth.
- Free tutorials provide unlimited exploration without financial risk, perfect for testing your interest in editing.
- Paid courses offer structured learning paths that eliminate guesswork and save time searching for content.
- Self-directed learning through free resources develops problem-solving skills and research abilities.
- Paid programs typically include community forums and instructor feedback for personalized guidance.
- Free content requires significant time investment to sort through varying quality levels and teaching styles.
- Paid courses represent a financial commitment that might not suit everyone’s budget initially.
- Self-directed paths can lead to knowledge gaps and missed foundational concepts.
- Structured paid courses may move too quickly or slowly for your individual learning pace.
Paid courses shine when you’re ready for systematic skill development. They provide curated learning paths designed by professional educators who understand how skills build upon each other. Most paid platforms offer completion certificates, downloadable resources, and project files that let you follow along exactly. The accountability factor shouldn’t be underestimated either—when you’ve invested money, you’re more likely to commit time and complete the course.
The sweet spot for most photographers? Start with free resources to build basic familiarity, then invest in a targeted paid course once you’ve identified specific areas where you want deeper expertise. This approach maximizes both your budget and learning efficiency while building the confidence that comes from self-directed exploration.
Common Mistakes Lightroom Beginners Make (And How to Fix Them)
We’ve all been there – you open Lightroom with excitement, start adjusting sliders, and suddenly your photo looks worse than when you started. Don’t worry, you’re not alone. Let’s walk through the most common mistakes beginners make and, more importantly, how to fix them.
The biggest culprit? Over-editing. It’s incredibly tempting to push those sliders to their extremes, especially when you first discover tools like Clarity and Vibrance. Your eyes adjust to the changes as you edit, making it hard to see when you’ve crossed the line into overdone territory. The fix is simple: after editing, step away for a few minutes, then come back with fresh eyes. You’ll immediately spot areas where you went overboard. Consider using the Before/After view (press Y) regularly during your editing process to keep yourself in check.
Poor file organization is another trap that will haunt you down the road. Randomly importing photos without a clear folder structure or keyword strategy might seem fine when you have 200 images, but wait until you hit 20,000. Start building good habits now by creating a logical folder system – many photographers organize by year and event or project. Use star ratings and color labels consistently to mark your best work. Think of it like organizing your physical space: a little effort upfront saves hours of frustration later.
Many beginners also ignore color calibration, wondering why their carefully edited photos look completely different on their phone or when printed. Your monitor might be displaying colors inaccurately, meaning all your hard work is built on a false foundation. Consider investing in a basic monitor calibration tool, or at minimum, adjust your screen brightness to moderate levels and avoid editing in harsh lighting conditions.
Finally, there’s the mistake of skipping the learning curve for keyboard shortcuts. Yes, clicking through menus works, but it’s painfully slow. Start with just five shortcuts – like C for Crop, Y for Before/After, and the number keys for ratings. Add more as these become second nature. Your future self will thank you when you’re breezing through edits instead of hunting through dropdown menus.
Remember, every expert photographer made these same mistakes when starting out. The key is recognizing them early and adjusting your workflow accordingly.
Mastering Adobe Lightroom is truly a journey, not a destination, and every expert editor you admire started exactly where you are now. The difference between feeling overwhelmed by sliders and confidently transforming your images lies in consistent practice paired with the right tutorials. Remember, there’s no shame in starting with the absolute basics, even if you’ve been photographing for years. Building a solid foundation in cataloging, understanding the histogram, and grasping what each adjustment actually does will serve you far better than jumping straight into advanced techniques.
The key is to progress systematically. Work through beginner tutorials until the interface feels like second nature, then challenge yourself with intermediate techniques that align with your photography style. Don’t try to learn everything at once. Instead, focus on one skill at a time, practice it on multiple images, and then move forward.
We encourage you to join the Camera Bar community as you develop your Lightroom skills. Sharing your progress, asking questions when you’re stuck, and seeing how others approach their edits will accelerate your learning in ways that solitary practice simply cannot match. Our community is built on support, not judgment, and we genuinely celebrate every milestone.
As you continue this journey, you’ll discover something wonderful: your personal editing style will emerge naturally. Lightroom isn’t just software; it’s a creative tool that unlocks endless possibilities for expressing your unique vision. Start today, stay curious, and trust the process.