
Environmental portrait photography places your subject in their natural surroundings to tell a richer, more complete story than a simple headshot ever could. Unlike studio portraits that isolate the person against a plain backdrop, environmental portraits weave together context, character, and place by photographing people where they work, create, or spend meaningful time. The technique requires balancing two competing elements: a sharp, well-lit subject and a contextual background that adds narrative depth without becoming distracting.
This portrait style has surged in popularity because it delivers authenticity. When you photograph a chef in their kitchen, a musician in a rehearsal space, or an artist surrounded by their work, you’re not just capturing a face. You’re documenting a relationship between person and environment that reveals passion, profession, and personality in a single frame.
The technical challenge lies in managing ambient light, choosing settings that keep both subject and background legible, and composing so the viewer’s eye travels naturally through the frame. You’ll need to scout locations thoughtfully, direct your subjects with confidence, and often work with available light or minimal gear. Unlike controlled studio work, environmental portraits demand adaptability and quick decision-making.
For photographers ready to move beyond traditional portraiture, mastering environmental portraits opens doors to editorial work, personal projects, and documentary storytelling. The skills translate directly to professional assignments where clients want images that communicate more than appearance alone.
If you’re looking to develop this skill through hands-on learning, workshop opportunities continue to emerge. The Canadian Rockies Photography Workshop runs September 20-25, 2026 (currently sold out) and September 26 to October 2, 2027, with instructors Viktoria Haack and Monika Deviat guiding a maximum of 10 participants through Banff and Lake Louise for $6,950 CAD plus GST in single occupancy. These immersive experiences offer direct feedback in stunning locations where environment naturally enhances every portrait.
What Makes an Environmental Portrait Different (And Why It Matters)
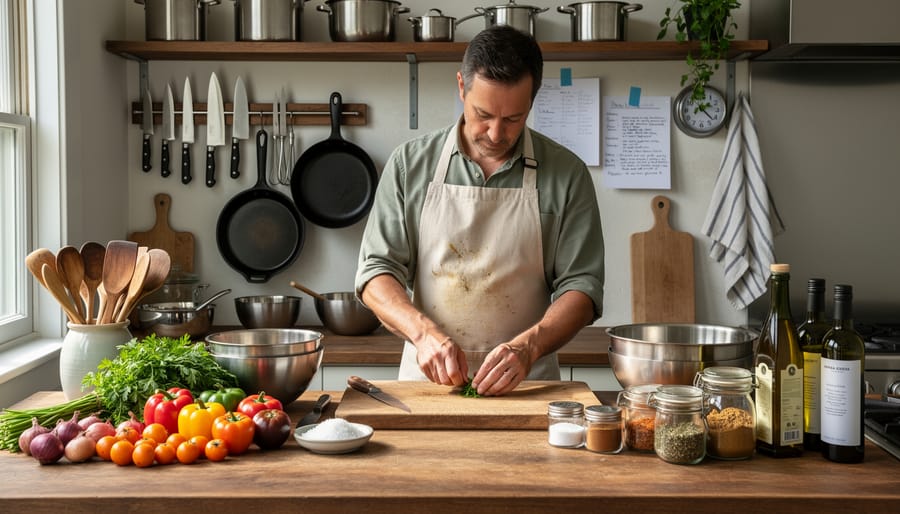
The difference between a perfectly lit studio headshot and an environmental portrait is the difference between seeing what someone looks like and understanding who they are. While traditional portraits isolate the subject against a neutral backdrop, environmental portraits deliberately weave surroundings into the frame, creating a visual story that reveals personality, profession, and purpose.
Think of a chef photographed in their kitchen, surrounded by copper pots and ingredient-prepped cutting boards. A musician captured in their home studio with instruments hanging on the walls behind them. An artist standing among half-finished canvases, paint-splattered floors telling the story of countless creative sessions. These settings aren’t just backgrounds. They’re evidence of how people spend their time, what they care about, and the worlds they’ve built around themselves.
- Environmental Portrait
- A portrait that includes meaningful surroundings relevant to the subject’s life, work, or identity, using the setting as a storytelling element rather than just a backdrop.
- Studio Portrait
- A controlled portrait captured against a plain or minimal background, focusing entirely on the subject’s appearance and expression without environmental context.
- Lifestyle Portrait
- A portrait showing subjects engaged in everyday activities in their natural environments, emphasizing action and moment over formal composition.
- Candid Portrait
- An unposed, spontaneous portrait capturing genuine moments and expressions, typically without the subject’s awareness they’re being photographed.
The philosophy behind environmental portraiture is simple but powerful: context creates meaning. When viewers see someone in their element, they make instant connections about that person’s life and identity. The woodworker’s calloused hands make more sense against a workshop full of tools. The teacher’s warm expression gains depth when surrounded by student artwork covering classroom walls.
This approach resonates strongly with modern audiences tired of artificial perfection. We’re drawn to authenticity, to glimpses behind the scenes, to understanding people beyond their polished public faces. Environmental portraits satisfy that hunger for genuine connection by showing not just a person, but their world.
The technique shifts your role as a photographer. You’re no longer just capturing a face. You’re documenting the relationship between people and the spaces that shape them, creating portraits that function as visual biographies rather than simple likenesses.
Choosing the Right Environment: Location as Your Silent Storyteller
Personal Spaces vs. Professional Settings
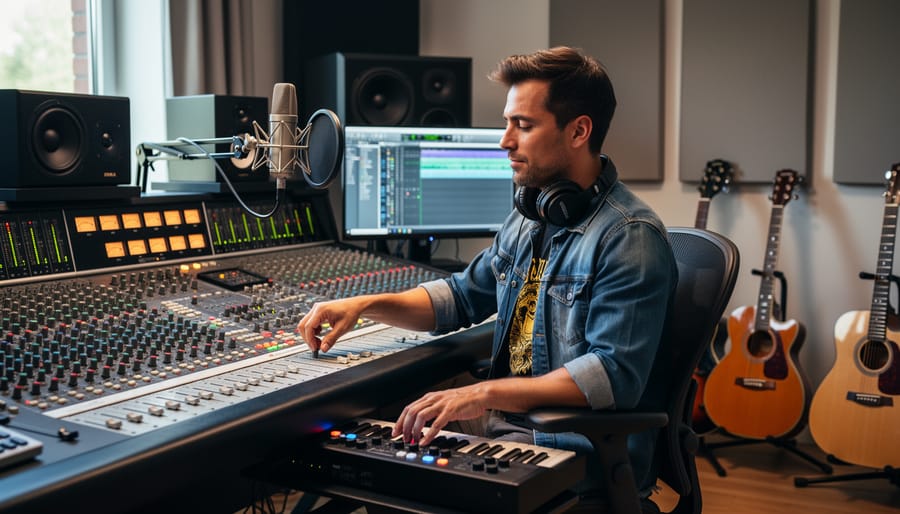
Personal spaces and professional settings each unlock different dimensions of a subject’s story. Home environments reveal intimacy, vulnerability, and personal identity, how someone decorates, what objects they cherish, the comfort of their private world. A writer photographed in their home library, surrounded by stacks of books and personal mementos, shows you who they are when no one’s watching.
Professional settings emphasize competence, passion, and craft. That same writer in a bustling newsroom or at a literary event projects authority and connection to their public role. Workshops and studios pulse with energy that homes rarely match, the controlled chaos of a pottery studio or the precision of a surgical theater tells stories homes can’t.
Choose based on what aspect of your subject matters most. Personal spaces work brilliantly for artists, collectors, and anyone whose private life defines them. Professional environments shine for subjects whose identity centers on their work or when you need to show mastery and action. Sometimes the strongest choice isn’t either-or: photograph a home-based entrepreneur in their converted garage studio, and you capture both worlds in one frame.
When Outdoor Environments Work Best
Outdoor settings shine when the location itself forms part of someone’s identity. A surfer photographed at their home break, a farmer in their fields, or a trail runner on a mountain ridge all gain authenticity from their natural environment. These spaces reveal how people interact with the world beyond four walls.
Weather becomes a storytelling tool rather than an obstacle. Overcast skies provide soft, even light that eliminates harsh shadows on faces while maintaining texture in landscapes. Golden hour adds warmth and drama, though it requires working quickly. Light rain or mist can create mood that reflects a subject’s connection to rugged outdoor spaces.
The key is ensuring the environment supports rather than overwhelms your subject. Wide apertures (f/2.8 to f/4) keep the person sharp while rendering backgrounds recognizable but not distracting. Position subjects where natural elements frame them, such as between trees or against a ridgeline that creates separation from the sky.
This approach has evolved into what many call portraitscapes, blending landscape photography techniques with environmental portraiture. The Pacific Shores Portraitscapes workshop (April 30-May 2, 2027) focuses specifically on this fusion, teaching photographers to balance stunning natural settings with compelling human subjects. For more outdoor portrait tips consider how your subject’s relationship with place can anchor the entire image.
Essential Camera Settings and Gear for Environmental Portraits

The gear you choose for environmental portraits isn’t radically different from standard portrait equipment, but how you use it shifts significantly. You’re not isolating your subject from their surroundings, you’re weaving them into a complete scene. That changes everything about your technical approach.
Start with Your Lens Choice
Wider focal lengths (24mm to 50mm) typically serve environmental portraits better than traditional portrait telephoto lenses. Why? They pull in more context without requiring you to stand across the room. A 35mm lens on a full-frame camera strikes a sweet balance: it captures enough environment to tell the story while keeping facial proportions natural. The 50mm works beautifully when you have slightly more space and want a tighter environmental frame.
That doesn’t mean telephoto lenses never work. An 85mm can create stunning environmental portraits when you have distance to work with and want to compress the background layers. But beginners often struggle when they instinctively reach for the 85mm or 70-200mm that worked great for headshots, then find themselves cramped in a small workshop or kitchen with nowhere to back up. If you’re exploring what makes the best camera for portraits in this style, prioritize versatile kit lenses over ultra-fast primes at first.
Aperture Strategy: Context Over Bokeh
Traditional portrait wisdom says shoot wide open (f/1.4 to f/2.8) for dreamy background blur. Environmental portraits flip that script. You’re showing where someone belongs, which means the setting needs clarity. How much aperture controls depth of field determines how readable your story becomes.
| Aperture Range | Focal Length | Effect |
|---|---|---|
| f/1.4, f/2.8 | 35mm, 85mm | Subject isolation with soft environmental hints |
| f/4, f/5.6 | 24mm, 50mm | Balanced subject/setting clarity (most versatile) |
| f/8, f/11 | 24mm, 35mm | Maximum environmental detail and context |
Shooting between f/4 and f/8 gives you enough depth to keep key environmental elements sharp while maintaining pleasing subject separation. A chef photographed at f/5.6 in their kitchen shows recognizable cooking tools and workspace character without rendering every pot handle in clinical sharpness.
Adapting to Available Light
Environmental portraits live or die by your ability to work with existing light. Auto ISO becomes your friend here, set it with a ceiling (ISO 3200 on most 2026 portrait cameras produces clean results) and let the camera adjust as you move through differently-lit areas of a location.
Start with aperture priority mode (A or Av) so you control depth while the camera handles shutter speed. Keep an eye on that shutter speed, though. Handholding below 1/60th second introduces camera shake, and subject movement blurs below 1/125th. If your shutter drops too low, widen your aperture or bump ISO rather than accepting blur.
In mixed lighting situations (window light plus overhead fluorescents), shoot RAW. You’ll need that flexibility when color-correcting the competing light sources later. And remember: environmental portraits thrive on natural, imperfect light. That slight shadow across your subject’s workspace tells part of the story.
Mastering Light in Real-World Environments
Light is both your greatest asset and biggest challenge in environmental portrait photography. Unlike controlled studio setups, you’re working with whatever illumination exists in your chosen space, and that reality demands a different mindset.
Start by reading the room. Walk around your environment before you shoot. Notice where light enters, how it falls across potential subject positions, and where shadows create depth or problems. Window light in an office might be perfect at 10 AM but harsh and contrasty by 2 PM. A garage workspace lit by overhead fluorescents will cast unflattering shadows under eyes and chin. Understanding what you’re working with determines whether you can shoot as-is or need help.
Most environmental portraits benefit from embracing existing light rather than overpowering it. The goal isn’t perfect, even illumination, it’s believable light that matches the mood of the space. A mechanic’s shop should feel a bit gritty and shadowy. A sunlit kitchen should maintain that warm, natural glow. When you modify light, do it subtly enough that the environment still feels authentic.
A collapsible reflector solves many problems without introducing artificial-looking light. Position it to bounce existing light back into shadow areas on your subject’s face. White reflectors create soft, natural fill. Silver adds more punch but can look obvious if you overdo it. In dim interiors, a reflector catching light from a nearby window can lift shadows just enough to maintain detail without looking lit.
Small, battery-powered flashes work when ambient light isn’t enough, but use them as fill, not your main source. Point the flash at a ceiling or wall to bounce indirect light onto your subject rather than blasting them directly. Set flash power low, you want to supplement the existing light, not replace it. The environment’s ambient light should still dictate the overall exposure and mood.
Dim interiors test your technique. Widen your aperture, but not so much that your subject and environment both blur into mush. Raise ISO as needed, modern cameras handle 1600 or 3200 remarkably well. Shoot slightly underexposed if necessary; you can recover shadow detail in Lightroom portrait edits more easily than blown highlights.
Mixed lighting, say, tungsten practicals plus window daylight, creates color temperature chaos. Either correct it in post or lean into it as part of the environment’s character. Sometimes that warm-cool contrast adds dimension rather than detracting.
Harsh outdoor light demands different tactics. Shoot in open shade where possible, building overhangs, tree cover, or even positioning your subject to face away from direct sun. If you must shoot in bright sun, use fill flash to lift shadows and prevent raccoon eyes. Overcast days gift you with natural softbox light, embrace the flat, even illumination rather than fighting it.
Directing Your Subject While Keeping It Natural
The difference between a portrait that feels authentic and one that looks staged often comes down to those first crucial minutes of the session. Your subject can tell within seconds whether you’re orchestrating a photo shoot or inviting them to be themselves in their own space.
Start by putting down your camera. Walk into the environment with your subject and simply talk. Ask them to show you around, explain what they do in this space, point out tools or objects that matter to them. This conversation serves two purposes: you’re gathering visual storytelling cues while simultaneously shifting their focus away from being photographed. When someone explains their work or passion, their body language opens up and their face becomes animated in ways no amount of posing can replicate.
Here’s a reliable approach for those opening minutes that builds comfort and captures genuine moments:
- Enter the space together and ask your subject to give you a brief tour, letting them touch and interact with familiar objects as they talk.
- Identify two or three spots or activities that feel most natural to them, asking where they typically spend time or what they’d normally be doing.
- Suggest they continue a real task rather than pose, something they’d actually do in this environment.
- Position yourself and begin shooting while maintaining conversation, treating the camera as secondary to your interaction.
- Give minimal direction at first, only adjusting major issues like harsh shadows or distracting background elements.
Once you’re shooting, resist the urge to micromanage every gesture. Instead, offer simple environmental prompts: “Can you show me how you normally hold that?” or “What would you be doing right now if I wasn’t here?” These questions guide without controlling, allowing subjects to move naturally within their space.
When you do need to adjust positioning, tie your direction to the environment rather than abstract posing concepts. Say “shift a bit closer to that window” instead of “turn your body 30 degrees left.” Reference objects in the room: “lean against your workbench” feels more natural than “put your weight on your back foot.”
Watch for moments when your subject forgets about the camera entirely. They’ll glance at something meaningful, reach for a tool, or settle into a comfortable stance. Those unguarded seconds often yield your strongest images. Shoot more during these moments and less when they’re clearly aware of being photographed.
The goal isn’t to eliminate all direction, but to make your guidance feel like collaboration rather than choreography. You’re not asking them to perform being themselves; you’re creating conditions where being themselves becomes the performance.
Composition Techniques: Balancing Subject and Setting
In environmental portraits, composition determines whether your setting enhances your subject or competes with them. The goal isn’t just to include the environment, it’s to orchestrate every element so the viewer’s eye moves naturally through the frame while understanding the story.
Start with the rule of thirds, but adapt it strategically. Placing your subject off-center creates space for environmental context that reveals their world. A craftsperson positioned in the left third lets you show their workshop stretching behind them, while centering them might flatten that spatial relationship. The empty space shouldn’t feel vacant; it should contain meaningful details that explain who this person is.
Control how much environment you include by adjusting your aperture and focal length together. Shoot at f/2.8 if the background provides essential context but needs softening, or stop down to f/8 when the details matter, tools on a workbench, books on shelves, equipment that defines the space. Wider focal lengths naturally incorporate more setting, but they also introduce distortion at frame edges, so position your subject where lines stay true.
Layering creates depth that pulls viewers into the scene. Place an element in the foreground, a doorway, machinery, plants, to establish a sense of entering the subject’s environment. Your subject occupies the middle ground as the anchor, while the background provides context. This three-plane approach transforms flat documentation into dimensional storytelling, applying high quality techniques that separate compelling portraits from simple snapshots.
Use environmental elements as natural frames: archways, windows, tree branches, or equipment that draws the eye inward toward your subject. But ensure these frames complement rather than cage, if a viewer notices the frame before the person, it’s overpowering the composition. The environment should guide attention, not demand it.
Learning Opportunities and Workshops in 2026
Developing your environmental portrait skills through hands-on workshops accelerates your learning in ways that solo practice can’t match. Working alongside experienced instructors in compelling locations forces you to solve real-world challenges on the spot, and you’ll see how professionals read light, direct subjects, and compose within unfamiliar environments.
Look for workshops that combine landscape and portrait techniques, since environmental portraits demand skills from both disciplines. You need to understand how to work with natural light and dramatic settings while maintaining focus on your human subject. The best learning experiences place you in visually rich environments where you’ll photograph real people in authentic contexts, not just models in generic settings.
The Canadian Rockies Photography Workshop (Sept 20-25, 2026 is sold out; Sept 26-Oct 2, 2027 still has availability) offers exactly this combination. Led by instructors Viktoria Haack and Monika Deviat, this intensive workshop bases participants in Banff and Lake Louise, providing dramatic mountain environments that challenge you to balance majestic landscapes with compelling portraits. With a maximum of 10 participants, you’ll get meaningful individual feedback as you work. The $6950 CAD plus GST (single occupancy) investment reflects the comprehensive nature of week-long immersion learning.
For those specifically interested in blending portraiture with coastal environments, Pacific Shores Portraitscapes (April 30-May 2, 2027) focuses on this emerging niche where landscape and portrait photography intersect.
When evaluating any workshop, prioritize small group sizes, experienced instructors who shoot in this style professionally, and locations that offer diverse environmental possibilities. The right workshop doesn’t just teach techniques; it transforms how you see the relationship between people and place.
Common Mistakes to Avoid (And How to Fix Them)
Even photographers who understand the concept of environmental portraits make predictable mistakes that undermine their results. The good news is that each of these pitfalls has a straightforward fix.
The most common error is letting the environment overpower the subject. You chose an interesting location, but now your viewer’s eye wanders to background details instead of connecting with the person. The correction is simple: use a wider aperture (f/2.8 to f/4) to soften busy backgrounds just enough, or reposition your subject against a cleaner section of the environment. You’re not erasing context, you’re controlling how much demands attention.
Distracting backgrounds come in many forms: bright windows behind the subject, poles or lines appearing to grow from their head, or clutter that adds nothing to the story. Before you shoot, scan the entire frame edges. Move three steps left or right, adjust your height, or ask your subject to shift slightly. Small positional changes eliminate distractions without changing locations.
Poor light management kills otherwise strong environmental portraits. Shooting in dim interiors with high ISO creates grainy, flat images, while harsh midday sun outdoors produces unflattering shadows. Fix this by recognizing when you need help: bring a reflector to bounce existing light onto your subject’s face, or use a small flash (bounced off walls or ceiling indoors) to lift shadows while preserving ambient character. You’re enhancing, not replacing, the natural light.
Pros
- Wide aperture (f/1.8-f/2.8) isolates subjects from busy backgrounds while maintaining recognizable environmental context.
- Close framing emphasizes emotional connection and facial expressions while still showing enough setting to tell the story.
- Narrow aperture (f/8-f/11) ensures both subject and environment remain sharp for maximum narrative detail.
Cons
- Wide aperture risks losing important environmental context that defines the portrait’s meaning and uniqueness.
- Close framing may exclude environmental elements that would strengthen the viewer’s understanding of the subject.
- Narrow aperture can make cluttered backgrounds compete too strongly with the subject for attention.
Finally, overly posed or stiff results plague photographers who treat environmental portraits like studio sessions. Your subject stands awkwardly, hands limp at their sides, staring at the camera with a forced smile. Instead, give them something to do that connects them to their space: a chef can prep ingredients, a musician can hold their instrument, an artist can examine their work. Action creates authenticity. Let them move naturally through their environment while you shoot, capturing moments rather than manufacturing poses.
These mistakes happen to everyone initially. The difference between struggling and succeeding comes down to recognizing these patterns in your own work and applying these specific corrections consistently.
Environmental portrait photography gives you something traditional studio work can’t: the chance to capture who people really are, not just what they look like. By placing your subjects in their meaningful spaces, you’re creating portraits that carry weight, context, and authentic stories that viewers can feel.
The beauty of this approach is that you don’t need elaborate setups or exotic locations to start. Your first subject could be a family member in their garden, a friend in their home workshop, or a colleague in the space where they do their best work. What matters is the connection between person and place, and your willingness to experiment until you find the right balance.
You won’t nail it on your first try, and that’s perfectly fine. Environmental portraiture is a skill that develops through practice, through making mistakes with composition or lighting, and learning what works in different spaces. Each session teaches you something new about reading environments, working with available light, and helping subjects feel comfortable enough to be themselves.
Camera Bar exists to support your growth as a photographer. Whether you’re troubleshooting your first attempts or refining advanced techniques, you’ll find resources and a community of fellow photographers exploring this same path.
So grab your camera and start simple. Find someone whose space tells a story, and capture them in it. Create portraits that matter, portraits that reveal, portraits that last. Your journey into environmental portrait photography begins with that first frame.